Advanced Matrix Multiplication Optimization on NVIDIA GPUs
This project is inspired by the outstanding works of Andrej Karpathy, George Hotz, Scott Gray, Horace He, Philippe Tillet, Jeremy Howard, Lei Mao and the best CUDA hackers from the GPU MODE community (Discord server). A special thanks to Mark Saroufim and Andreas Köpf for running GPU MODE and all you’ve done for the community.
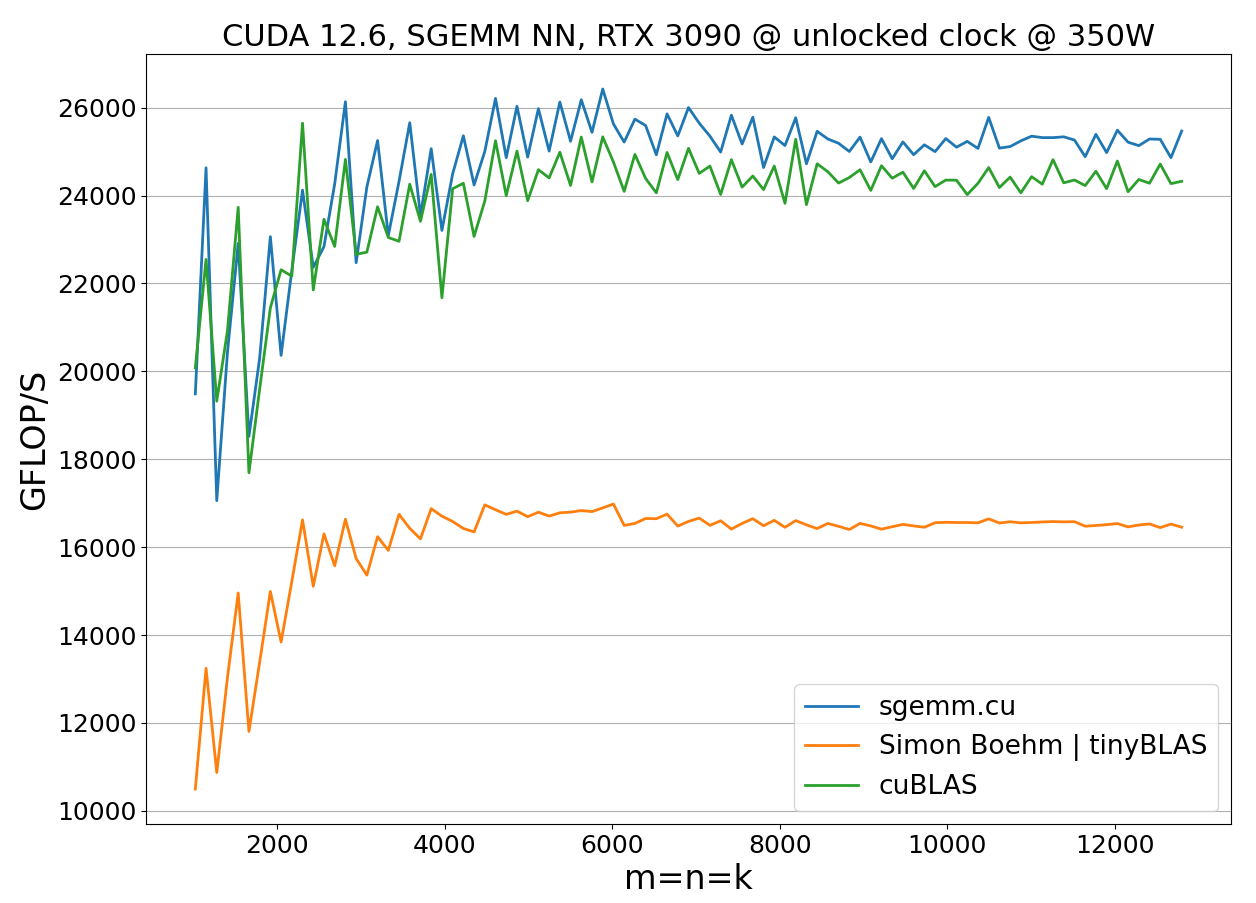
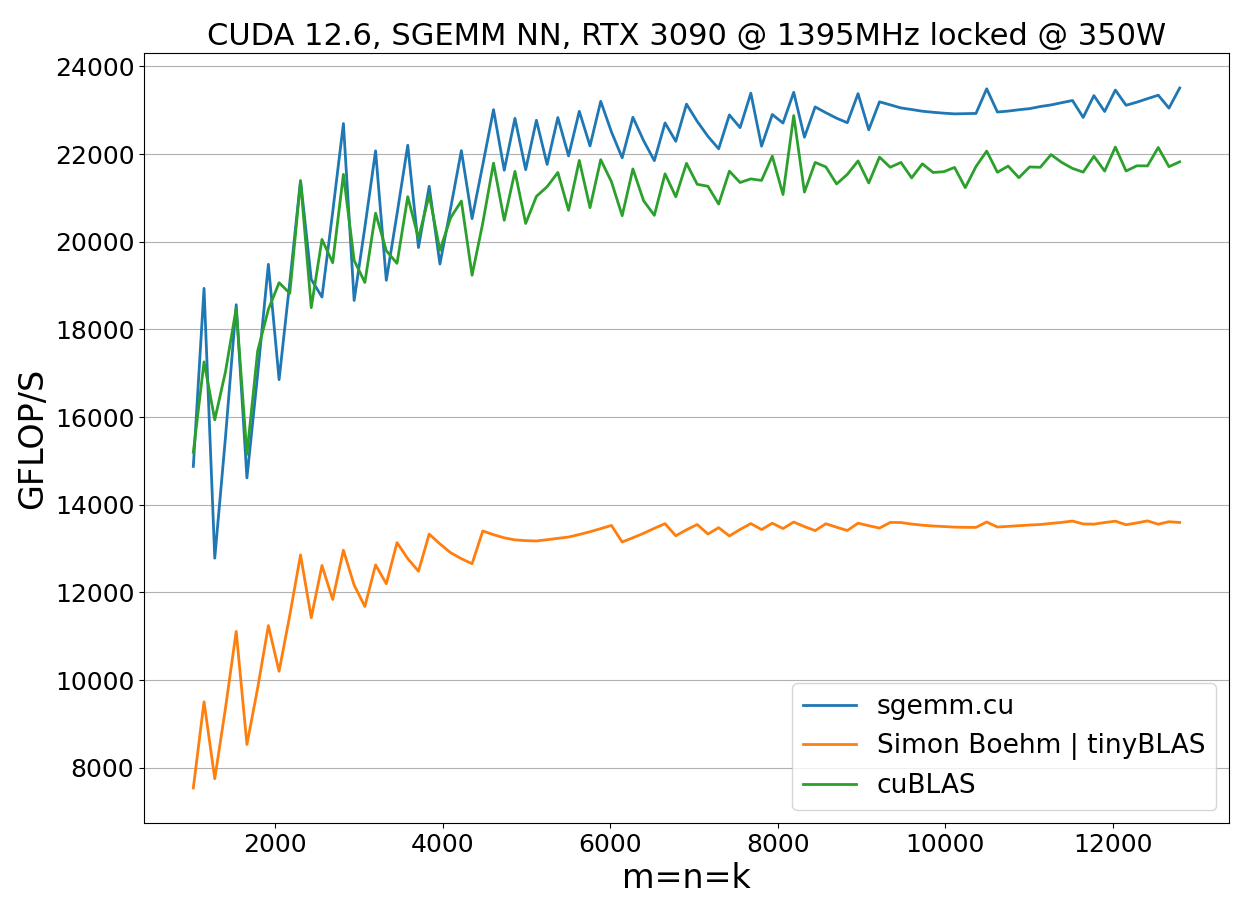
The code is available at sgemm.cu. This article complements my blog post, which covers the implementation of FP32 matrix multiplication that outperforms BLAS libraries on modern Intel and AMD CPUs. Today we’ll walk through a GPU implementation of SGEMM (Single-precision GEneral Matrix Multiply) operation defined as C := alpha*A*B + beta*C. The blog delves into benchmarking code on CUDA devices and explains the algorithm’s design along with optimization techniques. These include inlined PTX, asynchronous memory copies, double-buffering, avoiding shared memory bank conflicts, and efficient coalesced storage through shared memory. I’d also like to mention that the high-level algorithm design used in this project was developed by the excellent engineers at NVIDIA and has been extensively studied in prior works on cuBLAS and CUTLASS. My main contribution was translating it into efficient CUDA/PTX code. The goal of this project wasn’t to build an SGEMM that would magically outperform cuBLAS on all GPUs and all matrix sizes. This is especially pointless, given the open-sourced, lightweight CUTLASS library. Instead, the project primarily targets CUDA learners and aims to bridge the gap between the SGEMM implementations explained in books/blogs and those used in NVIDIA’s BLAS libraries. While the implementation is expected to deliver high performance on Ada/Ampere/Volta/Turing devices, it was specifically fine-tuned for and tested on a local NVIDIA RTX 3090 (=GA102 chip: RTX 3080, A10, A40, A6000). The achieved performance is shown below, comparing results with locked and unlocked GPU core frequencies against cuBLAS and Simon Boehm’s highly cited work (used in llamafile, aka tinyBLAS). I plan to continue publishing educational content on high-performance kernels used in AI/ML. Let me know what topics you’d like to see next! Projects currently in development: beating NVIDIA on Tensor Cores, Stream-K GEMM, FlashAttention, xLSTM. If you enjoy educational content like this and would like to see more, please share this article. Your feedback would be greatly appreciated!
P.S. Please feel free to get in touch if you are interested in collaborating. My contact information is available on the homepage.
1. Introduction
I clearly remember Andrej’s post on the current state of the existing cuda learning materials vs. cuda code used in high-performance libraries:

Indeed, when it comes to SGEMM implementations, there are some excellent educational blog posts, such as
- How to Optimize a CUDA Matmul Kernel for cuBLAS-like Performance (mentioned by Andrej)
- CUDA Matrix Multiplication Optimization
that break down, step by step, how to optimize a CUDA matmul kernel. However, in terms of achieved performance, none of them come close to matching the speed of cuBLAS or CUTLASS, especially when using recent CUDA versions and if benchmarked properly. From my experiments, these implementations achieve 50-70% of cuBLAS’ performance at best. Additionally, I found the explanations in both blog posts a bit overcomplicated in the final optimization steps. Nevertheless, I still think these resources are great for anyone starting with CUDA programming since they provide good foundational knowledge.
On the other hand, I’ve seen some really fast SGEMM implementations with cuBLAS-level performance:
The problem is that they are undocumented, difficult to find and understand, especially for a CUDA beginner. A similar problem exists with CUTLASS. While it is highly performant, there is a lack of introductory or educational materials explaining how it is internally designed and implemented in efficient CUDA/PTX. Another notable project is MaxAs, an assembler for the Maxwell architecture developed over a decade ago by Scott Gray. This tool enables programming directly in SASS (the assembly language for NVIDIA GPUs), allowing direct communication with the hardware instead of relying on the hardware-agnostic CUDA/PTX. Using MaxAs, Scott wrote an SGEMM implementation that achieved around 98% of the GM204 chip’s theoretical maximum FLOPS, surpassing cuBLAS by an average of 5%. While the results are impressive, programming in SASS is inflexible and requires deep understanding of the underlying hardware. Furthermore, with significant advancements in the compiler since then, programming directly in SASS is only advantageous in exceptional cases (for example, if you build tinygrad). CUTLASS achieves performance on par with cuBLAS across various GPU architectures and matrix sizes using only CUDA/PTX code.
But can we actually exceed the cuBLAS barrier? In the following chapters, we will briefly review the high-level SGEMM design used in CUTLASS, and discuss how to translate this design into efficient CUDA/PTX. This guide assumes only a basic knowledge of the CUDA programming model and linear algebra. If you are new to CUDA programming, I strongly recommend starting with these short introductory articles:
- An Easy Introduction to CUDA C and C++
- How to Access Global Memory Efficiently in CUDA C/C++ Kernels
- Using Shared Memory in CUDA C/C++
- Increase Performance with Vectorized Memory Access
Before we proceed with implementation, let’s talk about benchmarking code on NVIDIA GPUs - a topic often overlooked. Properly benchmarking code is just as important as the code itself, particularly when comparing different implementations.
2. How to Benchmark Code on CUDA Devices?
The most reliable way to measure kernel duration is by profiling with NVIDIA Nsight Compute and manually extracting performance data. To obtain deterministic and reproducible results, Nsight Compute automatically applies the following settings:
- Clock Control: locks GPU clock frequencies to their base values
- Cache Control: flushes all GPU caches before each replay pass
- Persistence mode
Alternatively, you can apply these settings manually and measure kernel duration at runtime without relying on external profilers. On Ubuntu, you can retrieve the base core clock frequency using:
nvidia-smi base-clocks
For instance, on an RTX 3090, the base core clock frequency is 1395 MHz. Next, you’ll need the memory clock frequencies, which work in combination with the base core clock:
nvidia-smi -q -d supported_clocks
From the list of supported frequencies, choose the fastest memory clock compatible with the base core frequency. Memory clock speeds are generally more stable than core clock speeds. To lock the clock frequencies and enable persistence mode, run the following commands:
sudo nvidia-smi --persistence-mode=1
# NVIDIA RTX 3090
sudo nvidia-smi --lock-gpu-clocks=1395
sudo nvidia-smi --lock-memory-clocks=9501
To reset the core and memory clock frequencies, you can use:
sudo nvidia-smi --reset-gpu-clocks
sudo nvidia-smi --reset-memory-clocks
sudo nvidia-smi --persistence-mode=0
GPU clock frequencies may drop due to the GPU’s thermal state, but for high-performance applications, throttling is often caused by power limits. Faulty hardware can also lead to throttling. It’s a good idea to monitor the GPU’s state at least during a test run. Use the following command to keep track of power draw, clock speeds, and throttling reasons in real time:
watch -n 0.1 nvidia-smi --query-gpu=power.draw,clocks.sm,clocks.mem,clocks_throttle_reasons.active --format=csv
A sample output might look like this:
308.50 W, 1395 MHz, 9501 MHz, 0x0000000000000000
The bit mask 0x0000000000000000 indicates no throttling, and the clocks are running at their maximum speeds. A value of 0x0000000000000001 indicates an idle state. Any other values suggest throttling is occurring. For a full list of bit mask values and their meanings, refer to the NvmlClocksThrottleReasons documentation.
Once you’ve locked the clock frequencies, you can measure the kernel duration directly in CUDA using CUDA events. Here’s an example:
cudaEvent_t start, stop;
cudaEventCreate(&start); cudaEventCreate(&stop);
float elapsed_time_ms = 0.0;

cudaEventRecord(start);
kernel<<<...>>>(...);
cudaEventRecord(stop);

cudaEventSynchronize(stop);
cudaEventElapsedTime(&elapsed_time_ms, start, stop);
For reliable measurements, multiple replay passes are typically used. In such cases, the GPU cache should be flushed before each kernel replay. This can be done using cudaMemsetAsync as shown in nvbench:
// Flush L2 cache
int dev_id{};
int m_l2_size{};
void* buffer;
checkCudaErrors(cudaGetDevice(&dev_id));
checkCudaErrors(cudaDeviceGetAttribute(&m_l2_size, cudaDevAttrL2CacheSize, dev_id));
if (m_l2_size > 0) {
    checkCudaErrors(cudaMalloc(&buffer, static_cast<std::size_t>(m_l2_size)));
    int* m_l2_buffer = reinterpret_cast<int*>(buffer);
    checkCudaErrors(cudaMemsetAsync(m_l2_buffer, 0, static_cast<std::size_t>(m_l2_size)));
    checkCudaErrors(cudaFree(m_l2_buffer));
}
Locking the clock frequencies to their base values is a reliable way to measure the speed of your kernel. However, in real-world scenarios, algorithms don’t typically run with locked clocks. To achieve optimal performance, your algorithm needs to be both fast and power-efficient. The less power your algorithm consumes, the higher the clock speeds your hardware can maintain. NVIDIA GPUs often reduce clock frequencies aggressively, well before hitting their power limits, which can significantly degrade application performance. To account for this, we benchmark our implementation under both locked and unlocked clock conditions, testing for both speed and power efficiency. In our benchmarks, we evaluate matrix sizes ranging from 1024 to 12,800 with a step size of 128. For each matrix size, we launch 1000*exp((-matsize+1024)/3100.0)) kernel replays and calculate the execution time as the average of the second half of the replays. For example, given matrix size problem m=n=k=4096, we run the sgemm 1000*exp((-4096 + 1024)/3100.0))=371 times and measure the average duration of the last 185 runs, ensuring the clocks have stabilized. This profiling strategy leads to consistent and reproducible results, even when GPU clocks are unlocked.
Avoid using WSL for performance measurements. To ensure accurate and reliable results, please use a native Linux environment.
3. Memory Layout
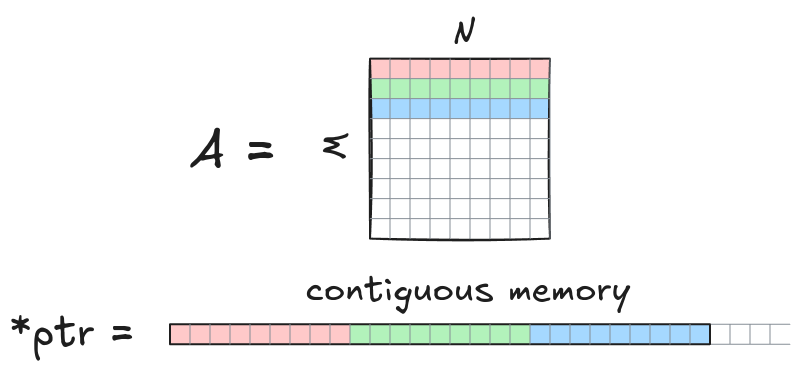
Without loss of generality in this implementation, we assume matrices are stored in row-major order. A matrix A with dimensions M x N is stored as contiguous array of length M*N. Elements A[row][col] are accessed via a 1D raw C pointer ptr[row*N + col] with 0<=col<=N-1 and 0<=row<=M-1. Matrix multiplication is denoted as $C=AB$, where the shapes of matrices $A, B, C$ are $M \times K, K \times N$ and $M \times N$, respectively.
To adapt this implementation for matrices stored in column-major order, simply swap the operands $A$ and $B$, because:
\[C^\text{T} = (A B)^\text{T} = B^\text{T} A^\text{T},\]Here, $A, B, C$ are matrices stored in row-major order, while $A^\text{T}, B^\text{T}, C^\text{T}$ are the corresponding transposed matrices (i.e., stored in column-major order).
cuBLAS provides an API to calculate SGEMM:
cublasSgemm(m, n, k, A, lda, B, ldb, C, ldc); // simplified form
with m, n, k denote the matrix sizes $M, N, K$. The parameters lda, ldb, ldc are the leading dimensions of matrices $A, B, C$, respectively. The leading dimension is the length of the fastest-varying dimension when iterating over the matrix elements (i.e., the length of the first dimension). For matrices stored in row-major order, the leading dimension is usually the number of columns, so typically lda=k, ldb=n, ldc=n. However, this isn’t always the case. In scenarios where you need to compute a submatrix of a larger matrix, the leading dimension might be larger than the number of columns.
Matrices may be also padded with zeros to support vectorized memory loads or tensor cores. The vectorized load instructions allow to load multiple elements at once using just 1 instruction. Though the vectorized loads reduce total number of instructions and improve bandwidth utilization, they also impose alignment constraint on input data, so that the leading dimension must be divisible by 2 (for 64-bit loads) or 4 (for 128-bit loads). The figure below illustrate the case for 128-bit (=4 floats) loads.
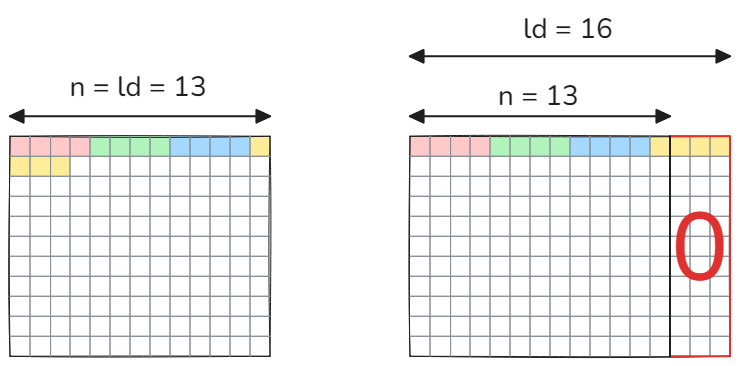
Note how it’s impossible to load the elements of the first row without touching the elements of the next row if the leading dimension is not divisible by 4. Padding with zeros helps, but requires additional memory. Another solution would be to check at runtime if the leading dimension is divisible by 4. If it is - then use vectorized loads, if not - scalar loads. Additionally, zero padding was commonly used in the past to enable tensor core computations. For instance, in cuBLAS versions < 11, Tensor Core FP16 operations required m, n, k to be multiples of 8.
4. Parallel Thread Execution
The CUDA compilation trajectory of a .cu file looks as follows:
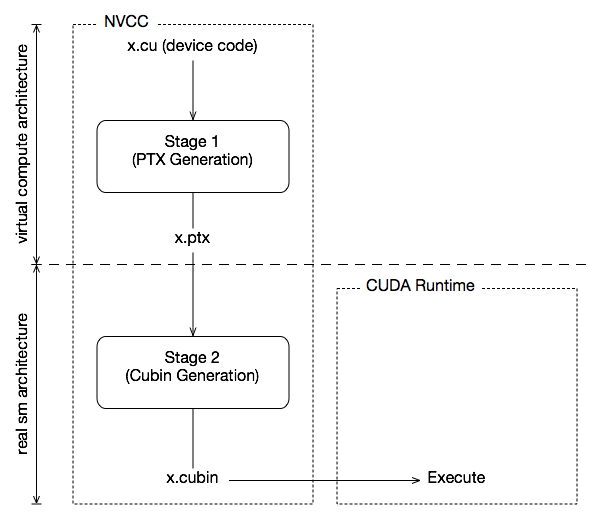
During Stage 1 CUDA code is compiled to PTX (parallel thread execution) instructions - intermediate high-level code, which can be considered as assembly for a virtual GPU architecture. Such a virtual GPU is defined entirely by the set of capabilities, or features, that it provides to the application. PTX doesn’t run on any real architecture, directly. It must be optimized and translated to native target-architecture instructions (Stage 2). NVIDIA provides a mechanism to insert PTX code into your CUDA program, so that you can mix CUDA/PTX in source code and still have benefits of code optimizations during the PTX generation. By rewriting parts of your code in PTX, you can 1) reduce total number of generated PTX instructions 2) exactly specify PTX instructions you need 3) tune the instructions through qualifiers 4) apply optimizations that are either lacking in the compiler or prohibited by C++ language extensions. Important! Using inline PTX Assembly will not make your code automatically faster than the one written in CUDA. It will only be faster if your hand-written PTX is better than the generated by the compiler.
In this implementation we will program some parts of the algorithm directly in PTX, so I highly recommend to check this short overview of inline ptx assembly if you have never used it before. The PTX instructions are well documented and can be found at PTX Instruction Set. We will now briefly review the PTX instructions used in this implementation.
4.1. Global Memory Loads
For global memory loads we will use ld.global.f32 instruction. Here, “ld” denotes “load” and “f32” - “32-bit float”. The following CUDA code
float reg; // single float register
float* gmem_ptr = data_in_global_memory; // pointer to global memory
reg = *gmem_ptr; // global memory -> register transfer
can be implemented in PTX as:
float reg; // single float register
float* gmem_ptr = data_in_global_memory; // pointer to global memory
asm volatile("ld.global.f32 %0, [%1];" : "=f"(reg) : "l"(gmem_ptr));
The f in "=f" denotes float datatype and the = modifier specifies that the register is written to. The l represents unsigned 64-bit integer. We also use volatile keyword to ensure that the instruction is not deleted or moved during generation of PTX.
4.2. Global Memory Stores
For global memory stores there is `st.global.f32 instruction:
float reg; // single float register
float* gmem_ptr = data_in_global_memory; // pointer to global memory
// *gmem_ptr = reg; can be implemented in PTX as:
asm volatile("st.global.f32 [%0], %1;" : : "l"(gmem_ptr), "f"(reg));
4.3. Global to Shared Memory Transfers
When you write something like this in CUDA:
__shared__ float smem_ptr[n]; // pointer to shared memory
float* gmem_ptr = data_in_global_memory; // pointer to global memory
*smem_ptr = *gmem_ptr; // global to shared memory transfer
a two-step process occurs. First, the data is fetched from global memory into registers and then that data is copied from registers into shared memory. Additionally the data is cached in all cache levels during the transfer.
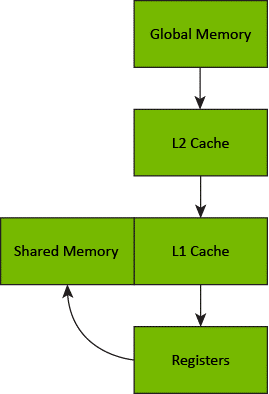
Global to shared memory transfers
For this reason, a global to shared memory transfer in PTX consists of two data movement instructions ld.global and st.shared:
__shared__ float smem_ptr[n]; // pointer to shared memory
uint64_t smem_addr;
// convert generic address to shared address (store location for st.shared instruction)
asm volatile("cvta.to.shared.u64 %0, %1;" : "=l"(smem_addr) : "l"(smem_ptr));

float* gmem_ptr = data_in_global_memory; // pointer to global memory
float buffer;
// global memory -> register
asm volatile("ld.global.f32 %0, [%1];" : "=f"(buffer) : "l"(gmem_ptr));
// register -> shared memory
asm volatile("st.shared.f32 [%0], %1;" : : "l"(smem_addr), "f"(buffer));
Prior to Ampere architecture it was not possible to transfer data from global memory directly to shared memory mitigating storing in registers. Starting from Ampere architecture, there are asynchronous copy instructions that allow this. The usage of these instructions will be demonstrated later.
4.4. Vectorized Shared Memory Loads and Stores
In PTX you can also implement vectorized memory operations (loading/storing multiple elements with one instruction). Here, v4 denotes vector with four elements:
float reg0, reg1, reg2, reg3;
uint64_t addr;
...
// Shared memory 128-bit loads
asm volatile("ld.shared.v4.f32 {%0, %1, %2, %3}, [%4];"
             : "=f"(reg0), "=f"(reg1), "=f"(reg2), "=f"(reg3)
             : "l"(addr));
// Shared memory 128-bit stores
asm volatile("st.shared.v4.f32 [%0], {%1, %2, %3, %4};"
             :
             : "l"(addr), "f"(reg0), "f"(reg1), "f"(reg2), "f"(reg3));
4.5. Predicated Execution
In PTX conditional executions are implemented using optional guard predicates. The following CUDA code:
float reg;
float* ptr; //pointer to global memory
unsigned guard;
...
if (guard != 0) {
    *ptr = reg;
}
can be converted to PTX as:
float reg;
float* ptr;
unsigned guard;
...
asm volatile(".reg .pred p;\n\t" // declare predicate 'p'
             ".setp.ne.u32 p, %2, 0;\n\t" // set 'p' to true if (guard != 0); ne="not equal"
             "@p ld.global.f32 %0, [%1];\n\t" // execute instruction if 'p' is true
             : "=f"(reg)
             : "l"(ptr), "r"(guard));
We use guard predicates in combination with global load/store instructions to perform global memory access only if it is not out of bounds.
5. SGEMM Design
Let’s now break down the high-level design of the algorithm. The paper Strassen’s Algorithm Reloaded on GPUs contains, in my opinion, one of the best visualizations of the SGEMM design from the CUTLASS library. The SGEMM algorithm can be roughly divided into three main parts:
- Transferring data from global to shared memory
- Loading data from shared memory and performing arithmetic operations
- Writing results back to global memory.
Each of these steps must be carefully optimized to achieve high overall performance. In the following sections, we’ll explore each step in detail and discuss efficient implementation strategies. It’s worth mentioning that the first step - “transferring data from global memory to shared memory” is the most challenging to grasp. However, once you understand this part, the remaining steps become much easier to follow.
5.1. Transferring data from global to shared memory
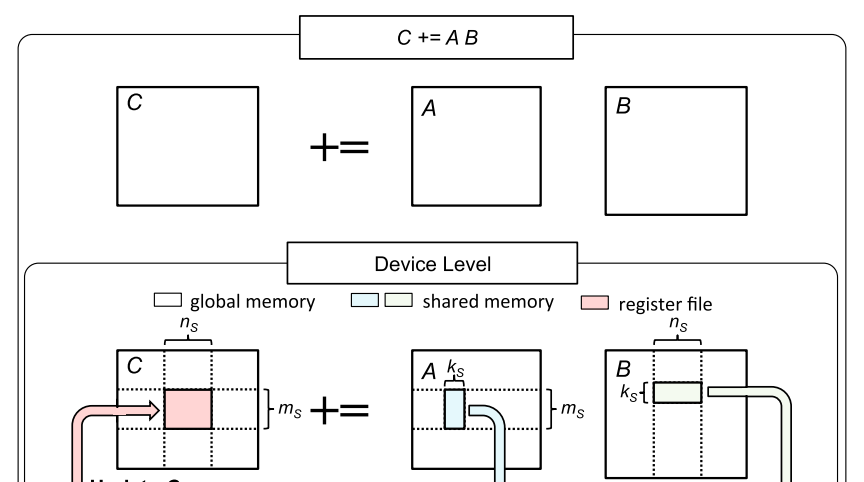
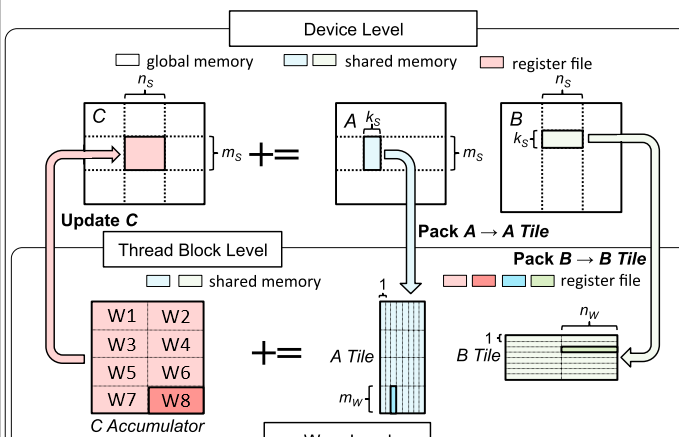
Source: Strassen’s Algorithm Reloaded on GPUs
To parallelize $C=AB$ on GPU, the matrix $C$ is partitioned into sub-matrices $\tilde{C}$ of size $m_S \times n_S$ and the sub-matrices are processed in parallel with one thread block computing one sub-matrix $\tilde{C}$ independently from other thread blocks. To compute $\tilde{C}$, we iterate over the dimension $K$. In each iteration, a submatrix $\tilde{A}$ of size $m_s \times k_s$ and a submatrix $\tilde{B}$ of size $k_s \times n_s$ are loaded from global into shared memory (see the figure above). These submatrices are then multiplied, and the result is used to update $\tilde{C}$ as $\tilde{C} += \tilde{A} \tilde{B}$. The sub-matrices $\tilde{A}, \tilde{B}, \tilde{C}$ are often called blocks or tiles. In total there are $K / k_s$ iterations (assuming the simplest case, where $K$ is divisible by $k_s$). The limited shared memory capacity is the reason why the dimension $K$ is divided into smaller $k_s$ blocks. Full $m_s \times K, K \times n_s$ blocks simply wouldn’t fit available shared memory. For now, don’t be distracted by why the matrices are loaded into shared memory and how exactly the matrices $\tilde{A}, \tilde{B}$ are multiplied, we will discuss it in the next chapter. Let’s focus on the efficient data movement from global to shared memory as our first step towards fast SGEMM.
The pseudo code of the algorithm, from the perspective of a thread block, is as follows:
// The shapes of block_a, block_b, block_c are (ms x ks), (ks x ns), (ms x ns)
// Each thread block computes one block of C:
block_c = 0
__shared__ float block_a[block_a_size]
__shared__ float block_b[block_b_size]
for (i=0; i<K/ks; i++) {
    block_a = load ith block of matrix A // from global into shared memory
    block_b = load ith block of matrix B // from global into shared memory
    block_c += block_a * block_b // compute matrix product and update block_c
}
store(block_c) // store to global memory
Data transfers from global memory to shared memory have significantly higher latency compared to arithmetic operations. During this time, threads are forced to stall, idly waiting for the data needed to compute block_a * block_b. One way to mitigate this latency is by overlapping data transfers with computations, leveraging instruction-level parallelism (ILP). In GEMM implementations, a technique known as double buffering is commonly used to achieve this overlap:
block_c = 0
// Shared Memory Double buffering
__shared__ float block_a[2][block_a_size] // 2x shared memory usage
__shared__ float block_b[2][block_b_size] // 2x shared memory usage
block_a[0] = load first block of matrix A
block_b[0] = load first block of matrix B

for (i=0; i<(K/ks-1); i++) {
    idx = i%2
    prefetch_idx = (i+1)%2
    // prefetch next blocks
    block_a[prefetch_idx] = load next block of matrix A
    block_a[prefetch_idx] = load next block of matrix B
    // use blocks loaded in previous iteration to calculate matrix product
    block_c += block_a[idx] * block_b[idx]
}
// final update of the accumulator using last blocks
block_c += block_a[prefetch_idx] * block_b[prefetch_idx]

store_to_global_memory(block_c)
Note that block_c += block_a[idx] * block_b[idx] doesn’t depend on blocks[prefetch_idx] allowing the arithmetic instructions to be issued in parallel with the data movement instructions. However, this comes at the cost of doubled shared memory usage, as we need to store two blocks instead of one. The good news is that modern GPUs have sufficient shared memory to support double-buffering.
We’ve already introduced several parameters such as block sizes $m_s, k_s, n_s$ and number of threads per thread block. The choice of these parameters highly depends on the shapes of the operands $A, B, C$, as well as the underlying GPU architecture. For example, cuBLAS implements multiple SGEMM kernels optimized for various matrix shapes and GPU architectures. At runtime, it selects the most appropriate kernel using a heuristic approach. The block sizes $m_s, k_s, n_s$ affect not only how the data will be fetched from global memory, but also how the work in all subsequent steps (shared memory loads, arithmetic operations, global memory stores) is organized among the threads to achieve the best possible performance. The choice of the block sizes and the number of threads per thread block also impact shared memory / register usage, which can result in decreased performance if not taken into account. As you might expect, identifying optimal parameter values requires excellent understanding of hardware and extensive experimentation. Fortunately, SGEMM is a well-studied problem and we can use the results from previous studies of cuBLAS and CUTLASS. For large square matrices (M=N=K > 1024) the combinations of $m_S \times n_S$ such as $128 \times 256$, $128 \times 128$ and $256 \times 128$ lead to optimal performance. From my tests, the configuration $m_s \times n_s \times k_s = 128 \times 128 \times 8$ with 256 threads per thread block achieved the highest TFLOP/S on my local RTX 3090 for matrix size problems 1024 <= M=N=K <= 2500. Therefore, we will start with implementation of a 128x128x8 SGEMM kernel. Now that we know the block dimensions and the number of threads per thread block, let’s discuss how to efficiently organize data loading from global memory and storage into shared memory.
First, we need to load 128x8 submatrix $\tilde{A}$ using 256 threads. This results in each thread loading 128*8/256 = 4 float elements from global memory. There are several different ways to organize the loading of the block. For global memory reads/stores you always want your accesses to be contiguous or coalesced, so that 32 threads in a wrap access 32 consecutive floats in memory. If a memory access is coalesced the minimum number of memory transactions will be used. However, it is not possible in case of the $\tilde{A}$ block: each row of the block contains only 8 consecutive elements. Nevertheless, even in such cases, consecutive threads in a wrap accessing consecutive elements in memory is preferable and usually results in better performance. The figure below shows how the loading of the block $\tilde{A}$ is implemented. Here, different colors represent different threads, whereas only first 16 threads are shown for simplicity. Four consecutive rows are loaded by 8 consecutive threads: the rows 1-4 are loaded by threads 0-7, the rows 5-8 are loaded by threads 8-15, the rows 9-12 are loaded by threads 16-23 and so on, with the last rows 125-128 are loaded by threads 248-255. We also transpose the block $\tilde{A}$ while storing in shared memory for better memory access pattern during the next computation step. Note how each thread stores 4 consecutive elements in shared memory. This allows us to use PTX vectorized stores st.shared.v4.f32.
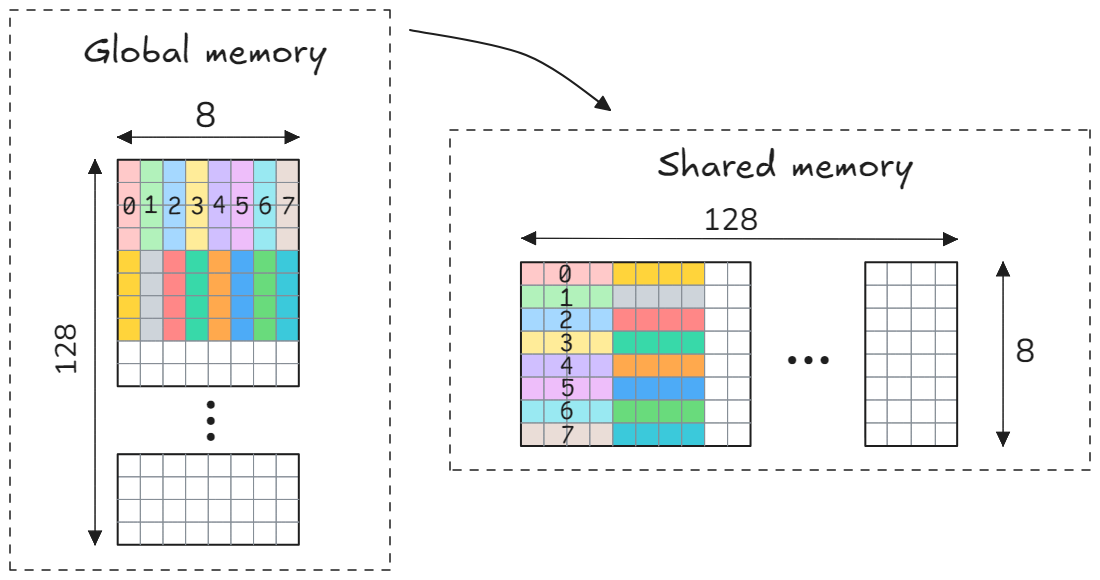
Storing to shared memory using this naive scheme would result in shared memory bank conflicts. From the CUDA programming guide:
To achieve high bandwidth, shared memory is divided into equally-sized memory modules, called banks, which can be accessed simultaneously. Any memory read or write request made of n addresses that fall in n distinct memory banks can therefore be serviced simultaneously, yielding an overall bandwidth that is n times as high as the bandwidth of a single module. However, if two addresses of a memory request fall in the same memory bank, there is a bank conflict and the access has to be serialized. The hardware splits a memory request with bank conflicts into as many separate conflict-free requests as necessary, decreasing throughput by a factor equal to the number of separate memory requests. If the number of separate memory requests is n, the initial memory request is said to cause n-way bank conflicts.
Shared memory has 32 banks that are organized such that successive 32-bit words map to successive banks. Imagine a float32 array of size 8x32 stored in row-major order as shown below.
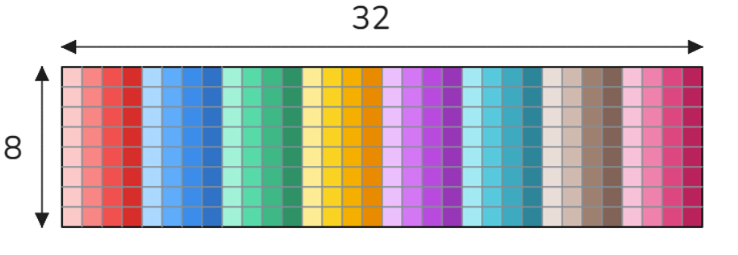
In this context, colors and their shades represent memory banks: each row corresponds to 32 distinct memory banks, while each column represents a single memory bank. Here are two important notes about shared memory bank conflicts:
- The determination of bank conflicts is made per memory transaction (or using modern CUDA language - per wave), not per request, not per warp, not per instruction.
- Two requests to the same bank and the same 32-bit location in that bank do not create a bank conflict (illustrated in the CUDA programming guide).
When you store (or load) 4 bytes(= 1 float) per thread, which is 4*32=128 bytes per warp, a CUDA device issues a single memory transaction (warp-wide) so that the shared memory access must be conflict-free across the whole wrap(=32 threads). In our case, we store 16 bytes(= 4 floats) per thread using the vector instructions. Warp-wide that will be a total of 512 bytes per request. The GPU splits the request into 4 memory transactions (threads 0-7 make up a transaction, threads 8-15 a transaction and so on), each of which is 128 byte wide. If we would store according to our scheme, then each thread within threads 0-7 would store to the same four columns (red color shades) or with other words to the same four memory banks causing bank conflicts. The same applies for other memory transactions i.e. threads 8-15, threads 16-23 and so on. One possible way to completely avoid bank conflicts would be to pad the leading dimension with 16 bytes (=4 floats) as shown below.
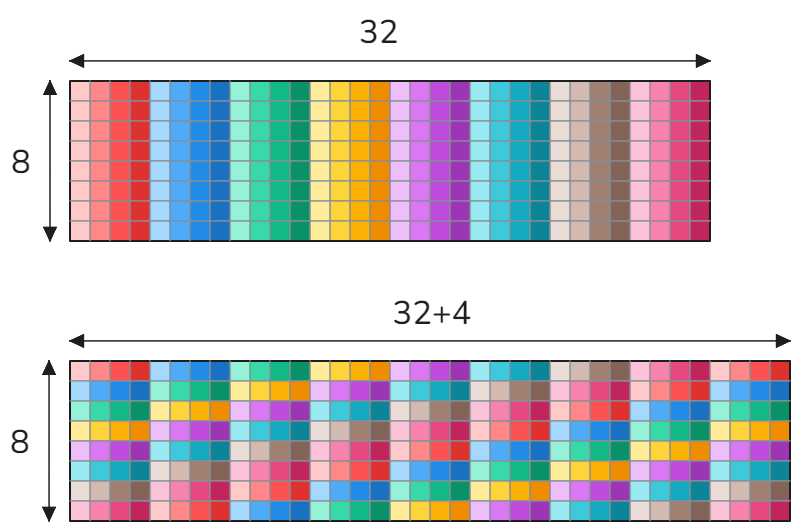
Now, if we store the data according to our scheme, each thread within threads 0-7 would accesses distinct memory banks, resulting in 32 memory banks being accessed per memory transaction. The same applies for the remaining memory transactions i.e. t8-t15, t16-t23 and so on. This is the reason why the leading dimension is 132 and not 128 in the implementation:
const int smem_a_ld = 132; // 128 + 4
To implement double-buffering and store two $\tilde{A}$ blocks, theoretically, we would need shared memory of size 2*132*8*4 bytes. However, we increase the size to the nearest power of 2 = 2*256*8*4 to enable fast switching. Compare the following code with the pseudocode presented at the beginning of the chapter:
// Double-buffering (blocks_b is omitted for simplicity)
__shared__ float __align__(2*256*8*sizeof(float)) blocks_a[2*256*8]
uint64_t lds_a_addr;
uint64_t sts_a_addr;
float* lds_a_ptr = blocks_a; // lds = load shared
float* sts_a_ptr = blocks_a; // sts = store shared
lds_a_addr = convert_to_addr(lds_a_ptr); // convert pointer to address for PTX load/store instructions
sts_a_addr = convert_to_addr(sts_a_ptr); // convert pointer to address for PTX load/store instructions

// store first block to first half of shared memory
sts_ptx(sts_a_addr);
// switch address to second half of shared memory
sts_a_addr ^= 8192;

for (int i=0; i<(K/ks-1); i++) {
    ...
    // store next block to second(first) half of shared memory
    sts_ptx(sts_a_addr);
    ...
    // load block from first(second) half of shared memory to compute c+=block_a*block_b
    lds_ptx(lds_a_addr);
    ...
    // swap the addresses for next iteration: lds_a_addr = sts_a_addr, sts_a_addr = lds_a_addr
    lds_a_addr ^= 8192;
    sts_a_addr ^= 8192;
    ...
}
...

First, we require blocks_a to be 2*256*8*4=2^14=16384-byte aligned. This implies the address of the first element of blocks_a to be divisible by 16384 or with other words the last 14 bits of the address are zero:
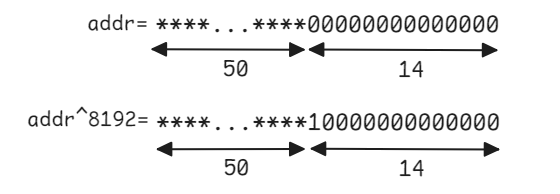
As each block size is 8192=2^13 bytes, switching between the blocks can now be implemented with just a single XOR instruction ^= 8192. The only drawback of this method is the unused shared memory (in this case 2*8*128*4 bytes). However, this can be ignored considering maximum amount of shared memory per thread block on modern GPUs.
Loading and storing a 8 x 128 submatrix $\tilde{B}$ is much simpler to manage due to its shape. Since the sub-matrix must not be transposed, the loading and storing schemes are identical:
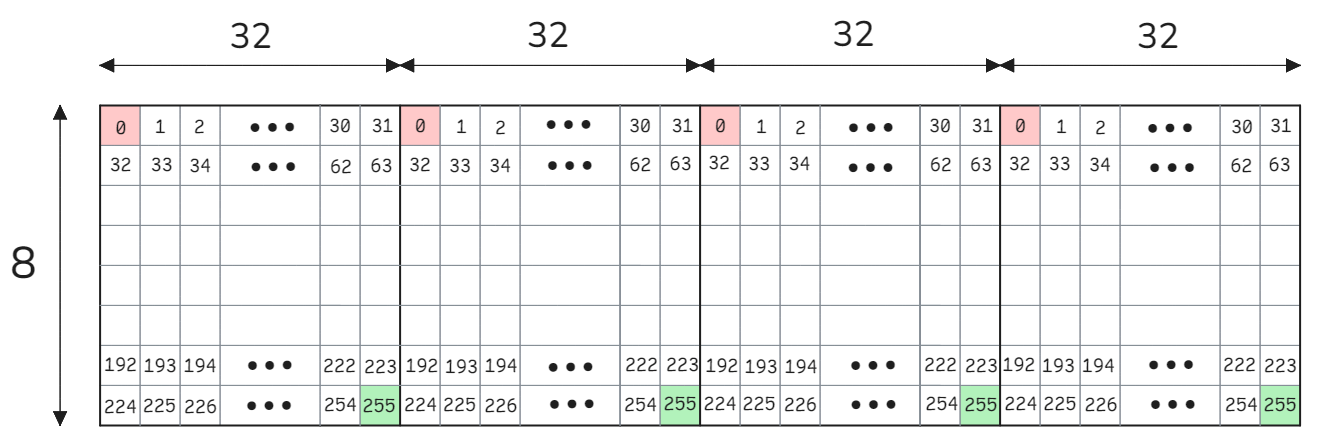
We use 32 consecutive threads to load 32 consecutive elements, with each thread loading 4 elements, spaced apart by a stride of 32. Note that since we store data in 32 distinct shared memory banks, no padding is required, and bank conflicts are avoided. Furthermore, the block size 128*8 is naturally a power of two, eliminating the need for additional padding and allowing block switching with a single XOR ^=4096 instruction.
5.2. Shared Memory Loads and Arithmetic Operations
With blocks $\tilde{A}$ and $\tilde{B}$ now residing in shared memory, let’s discuss how to efficiently load from shared memory and compute block $\tilde{C}$. To do this, we’ll dive one level deeper into our parallelization strategy and describe the algorithm from a warp’s perspective:
Launched thread block consists of 256 threads, which corresponds to 256/32=8 warps. The block $\tilde{C}$, with dimensions $128 \times 128$, is, therefore, divided into 8 regions $\tilde{C}_W$ labeled $W1, …, W8$ in the figure. Each region $\tilde{C}_W$ has dimensions $m_W \times n_W = 32 \times 64$ and is computed by a single warp: $W1$ is computed by threads t0-t31, $W2$ is computed by threads t32-t63, and so on, with $W8$ computed by threads t224-t255. The figure above uses $W8$ as an example to demonstrate how a single $\tilde{C}_W$ region is computed. We iterate over the dimension $K$ and in each iteration we
- load
fragment_a(=column of size $m_W \times 1$) from $\tilde{A}$ into registers - load
fragment_b(=row of size $1 \times n_W$) from $\tilde{B}$ into registers - multiply the fragments and update $\tilde{C}_W$
As $k_S = 8$, there will be in total 8 iterations. This explanation is from the perspective of a warp. Now, let’s delve one final level deeper and examine how the work within a warp is distributed among its 32 threads.
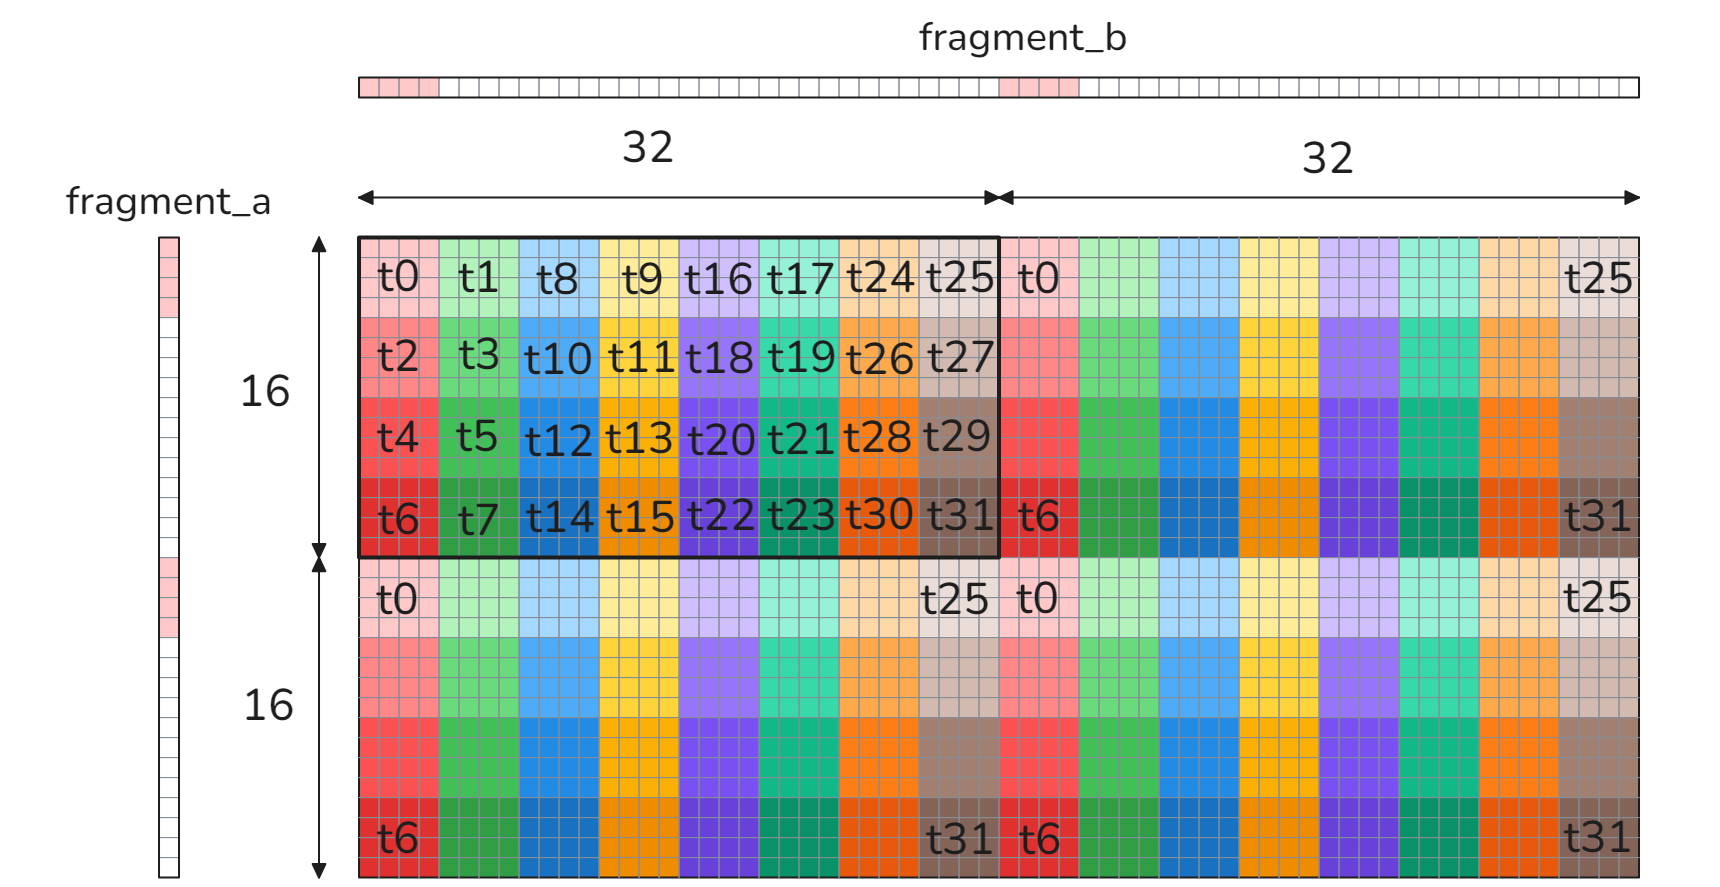
Each thread in a wrap computes four 4x4 sub-matrices (=accumulators) within $\tilde{C}_W$ or if concatenated - 8x8 accumulator. To do this, each thread loads 8 elements from fragment_a, 8 elements from fragment_b (as illustrated for thread t0 in the figure), multiplies them and updates the accumulator using fused multiply-add (FMA) instructions. Since block_a was transposed in the previous step, the elements in fragment_a are stored contiguously in memory, allowing faster access through vectorized loads. The threads are arranged in a way that avoids bank conflicts and works around NVIDIA’s shared memory broadcast limitation. This limitation occurs when 4 floats loaded using 16-byte vector instruction must be broadcast to more than 4 consecutive threads within a warp.
Bringing everything together, the entire SGEMM algorithm can be visualized as follows:
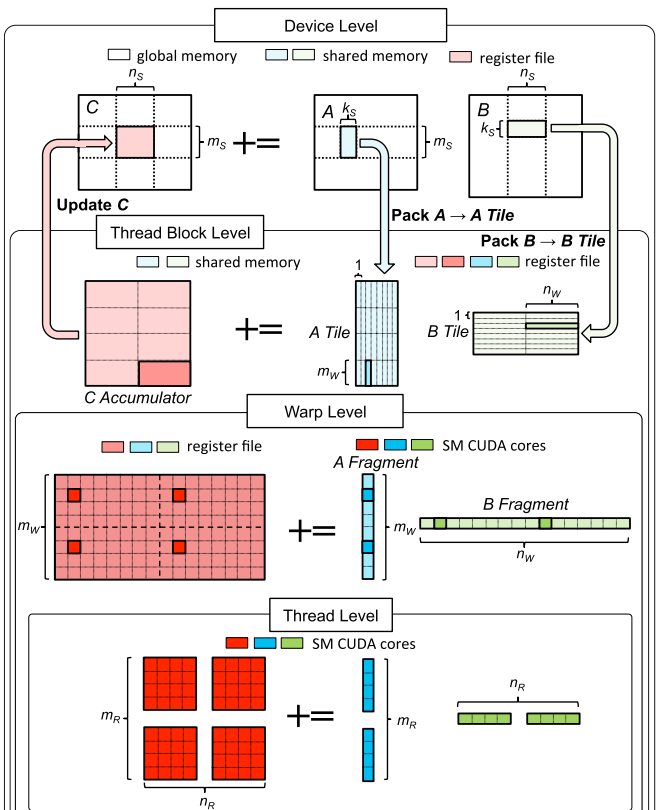
As you might expect, the accumulators are frequently updated during the computation and need to be stored in the fastest memory - the register files. Each thread allocates float accumulator[8][8], so that the entire block $\tilde{C}$ of size $128 \times 128$ is stored in registers by the 256 threads. This works because 256=16*16, and the combined arrangement (16*8)x(16*8)=128x128 matches the size of $\tilde{C}$. Just as we used double buffering to load the blocks $\tilde{A}$ and $\tilde{B}$ (from global memory to shared memory), we now also double buffer the fragments to minimize memory transfer latencies when moving data from shared memory to registers. The pseudocode for the algorithm can be written as follows:
// Pseudocode
__shared__ float block_a[2][block_a_size]
__shared__ float block_b[2][block_b_size]
float fragment_a[2][8]
float fragment_b[2][8]
float accumulator[8][8]

block_a[0] = load first block of matrix A
block_b[0] = load first block of matrix B
fragment_a[0] = load first fragment from block_a[0]
fragment_b[0] = load first fragment from block_b[0]

for (block_k=0; block_k<(K/ks-1); block_k++) {
    block_idx = block_k % 2
    block_prefetch_idx = (block_k+1) % 2
    // prefetch next blocks (Shared Memory Double buffering)
    block_a[block_prefetch_idx] = load next block of matrix A
    block_a[block_prefetch_idx] = load next block of matrix B
    for (int warp_k=0; warp_k<8; warp_k++) {
        frag_idx = warp_k % 2
        frag_prefetch_idx = (warp_k + 1) % 2
        // prefetch next fragments (Register Double buffering)
        fragment_a[frag_prefetch_idx] = load next fragment from block_a[block_idx]
        fragment_b[frag_prefetch_idx] = load next fragment from block_b[block_idx]
        // use fragments loaded in previous iteration to calculate matrix product
        for (int i = 0; i < 8; i++) {
            for (int j = 0; j < 8; j++) {
                accumulator[i][j] += fragment_a[frag_idx][i] * fragment_b[frag_idx][j];
            }
        }
    }
    fragment_a[0] = load first fragment from block_a[block_prefetch_idx]
    fragment_b[0] = load first fragment from block_b[block_prefetch_idx]
}

// final update of the accumulator using last blocks
for (int warp_k=0; warp_k<8; warp_k++) {
    frag_idx = warp_k % 2
    frag_prefetch_idx = (warp_k + 1) % 2
    // prefetch next fragments (Register Double buffering)
    fragment_a[frag_prefetch_idx] = load next fragment from block_a[block_prefetch_idx]
    fragment_b[frag_prefetch_idx] = load next fragment from block_b[block_prefetch_idx]
    // use fragments loaded in previous iteration to calculate matrix product
    for (int i = 0; i < 8; i++) {
        for (int j = 0; j < 8; j++) {
            accumulator[i][j] += fragment_a[frag_idx][i] * fragment_b[frag_idx][j];
        }
    }
}

// After completing the matrix multiplication C=A*B, we perform one final update to the accumulator
// to compute  C=alpha*A*B before storing the result back to global memory:
for (int i=0; i<8; i++) {
    for (int j=0; j<8; j++) {
        accumulator[i][j] *= alpha;
    }
}

store_to_global_memory(accumulator)
5.3. Coalesced Global Memory Stores Through Shared Memory
Just as with global memory reads, we want our global memory writes to be coalesced. However, directly storing the accumulators to global memory based on our current mapping
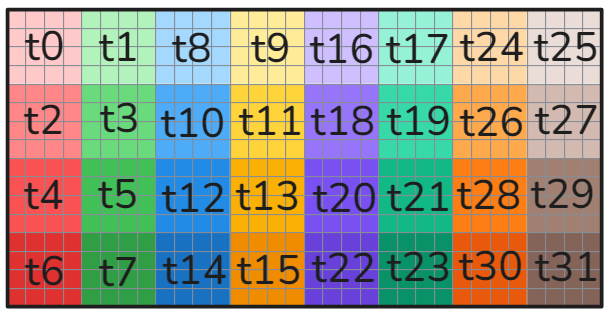
would result in random memory accesses, significantly hurting performance. To fix this, we use shared memory as a buffer to rearrange the accumulators, enabling coalesced global memory writes. At this stage, the accumulators have already been computed, so we no longer need shared memory for computation. Transferring data from registers to shared memory is fast. The overhead of these additional transfers from registers to shared memory is negligible compared to the performance gains achieved through coalesced writes. We write the accumulator’s elements to shared memory row by row according to the following scheme:
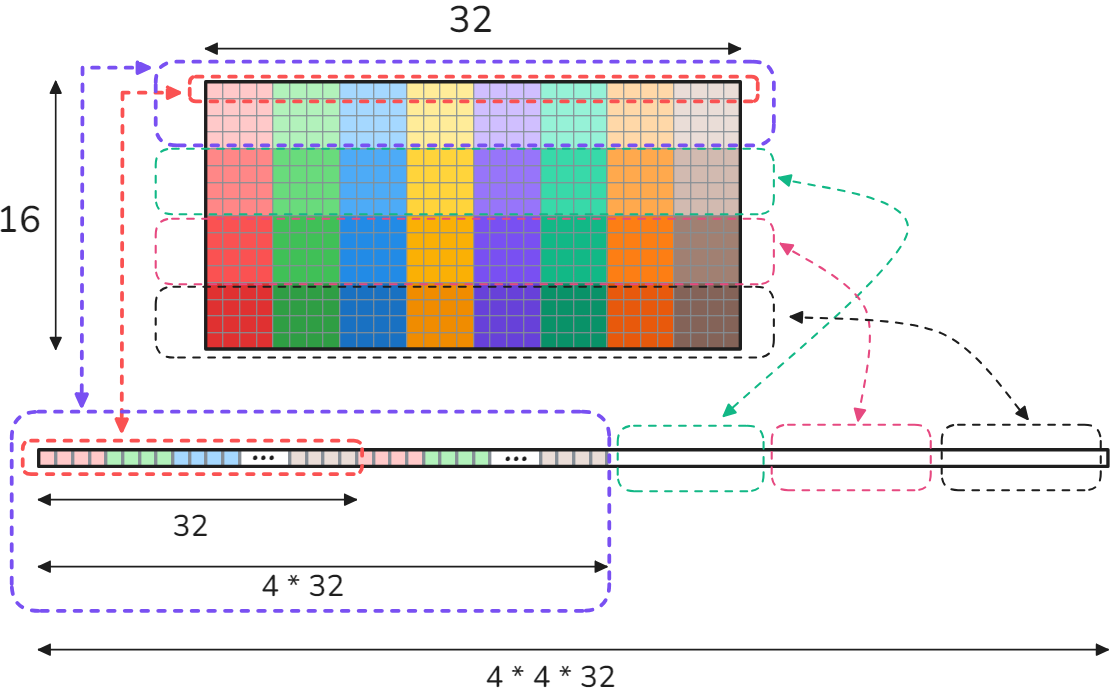
The first row, containing 32 elements, is copied to the first 32 consecutive memory addresses in shared memory. Similarly, the second row is copied to the next 32 consecutive memory addresses, and so on with all 16 rows have been copied to shared memory. Next, we iterate through the rows in shared memory, and in each iteration, we store a row (containing 32 elements) to global memory using coalesced writes:
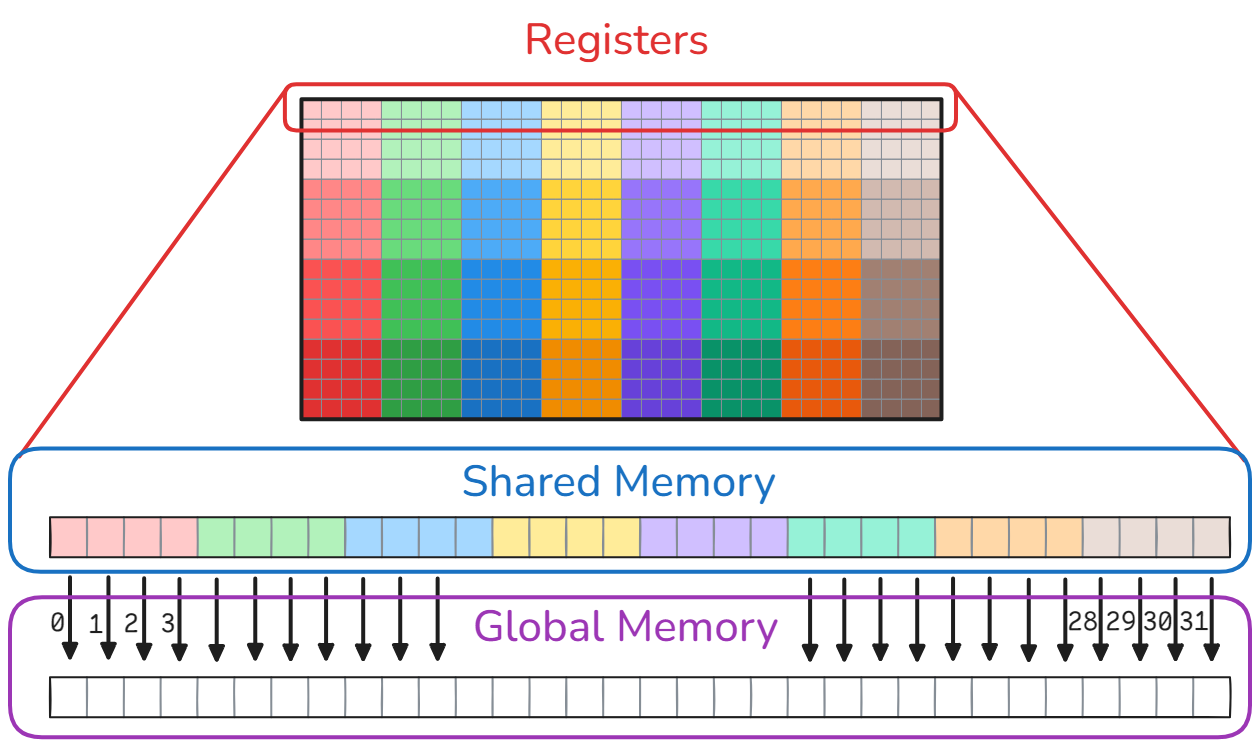
The process is then repeated for the other three 4x4 accumulators of the threads.
To compute $C := \alpha AB + \beta C$, we make a slight adjustment to the process of storing the data to global memory. After copying the accumulator from registers to shared memory, we check if beta != 0.0. If true, we load (using coalesced loads) the corresponding element from global memory into a register, multiply it by beta and add the result to the accumulator stored in shared memory. Finally, we store the updated accumulator alpha*A*B+beta*C from shared memory to global memory using coalesced writes.
6. Performance Analysis
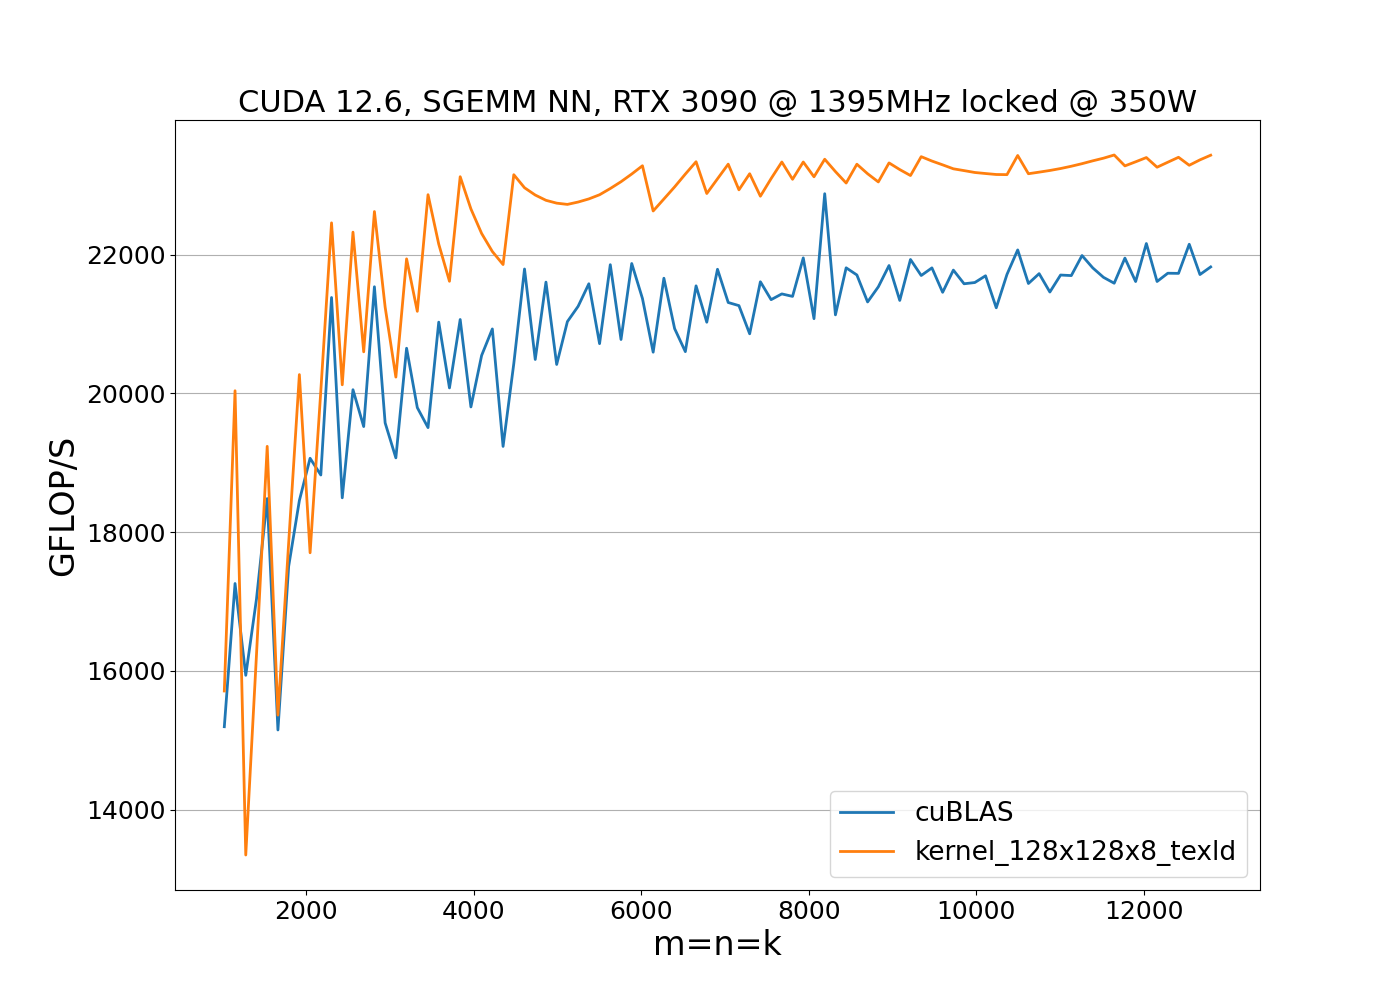
So far, we have discussed the design of the 128x128x8 SGEMM kernel. Its implementation is available at 128x128x8.cuh and closely follows the pseudo-code outlined earlier. Let’s now benchmark this kernel to evaluate its performance. First, we conduct a benchmark with locked clock frequencies:
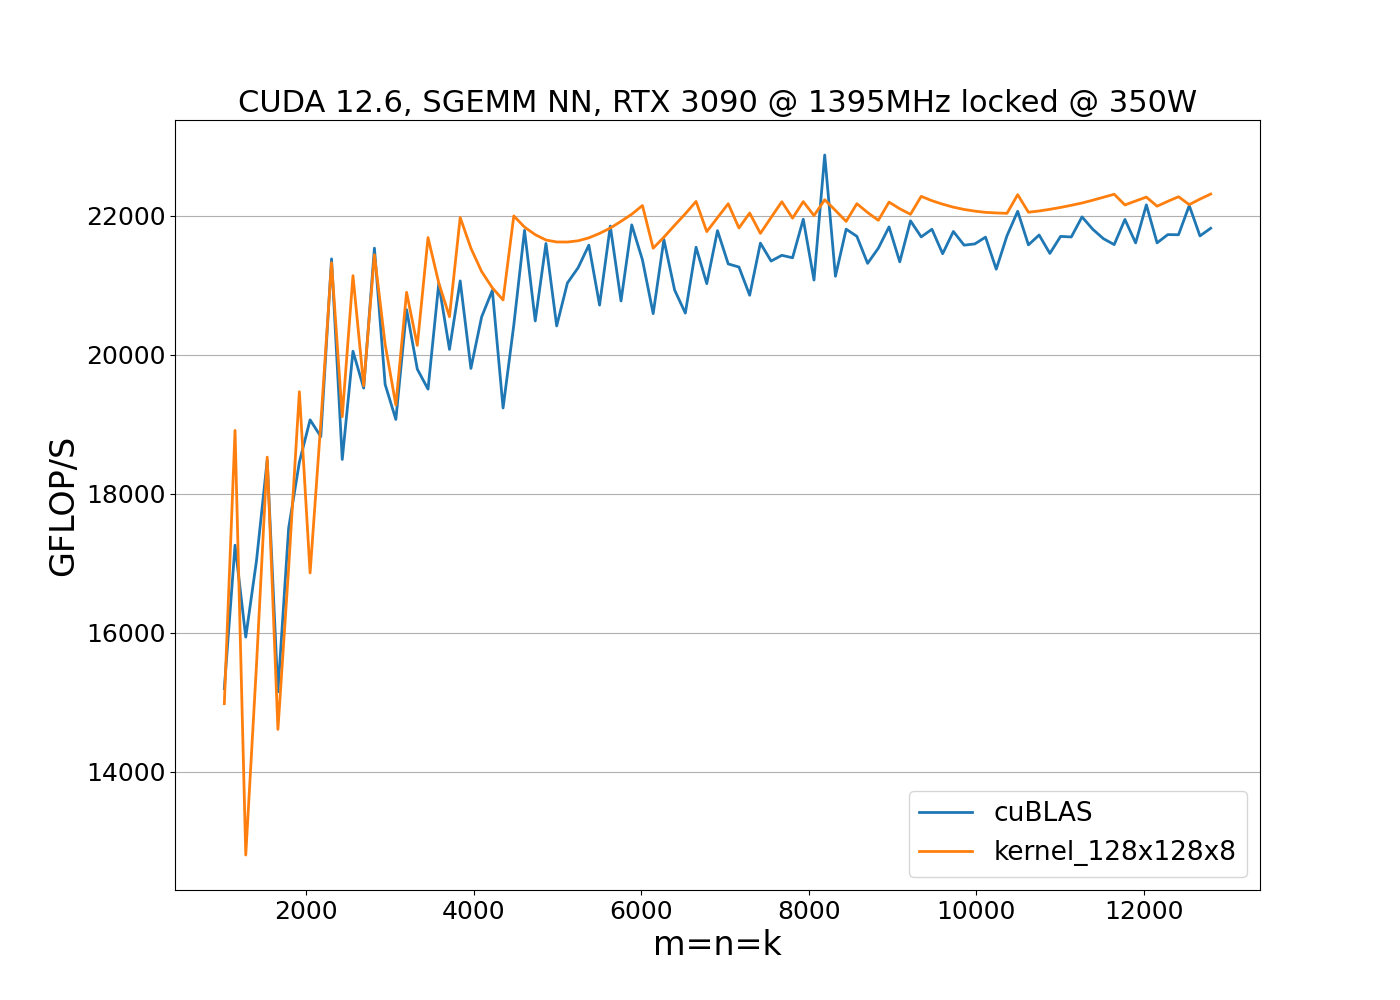
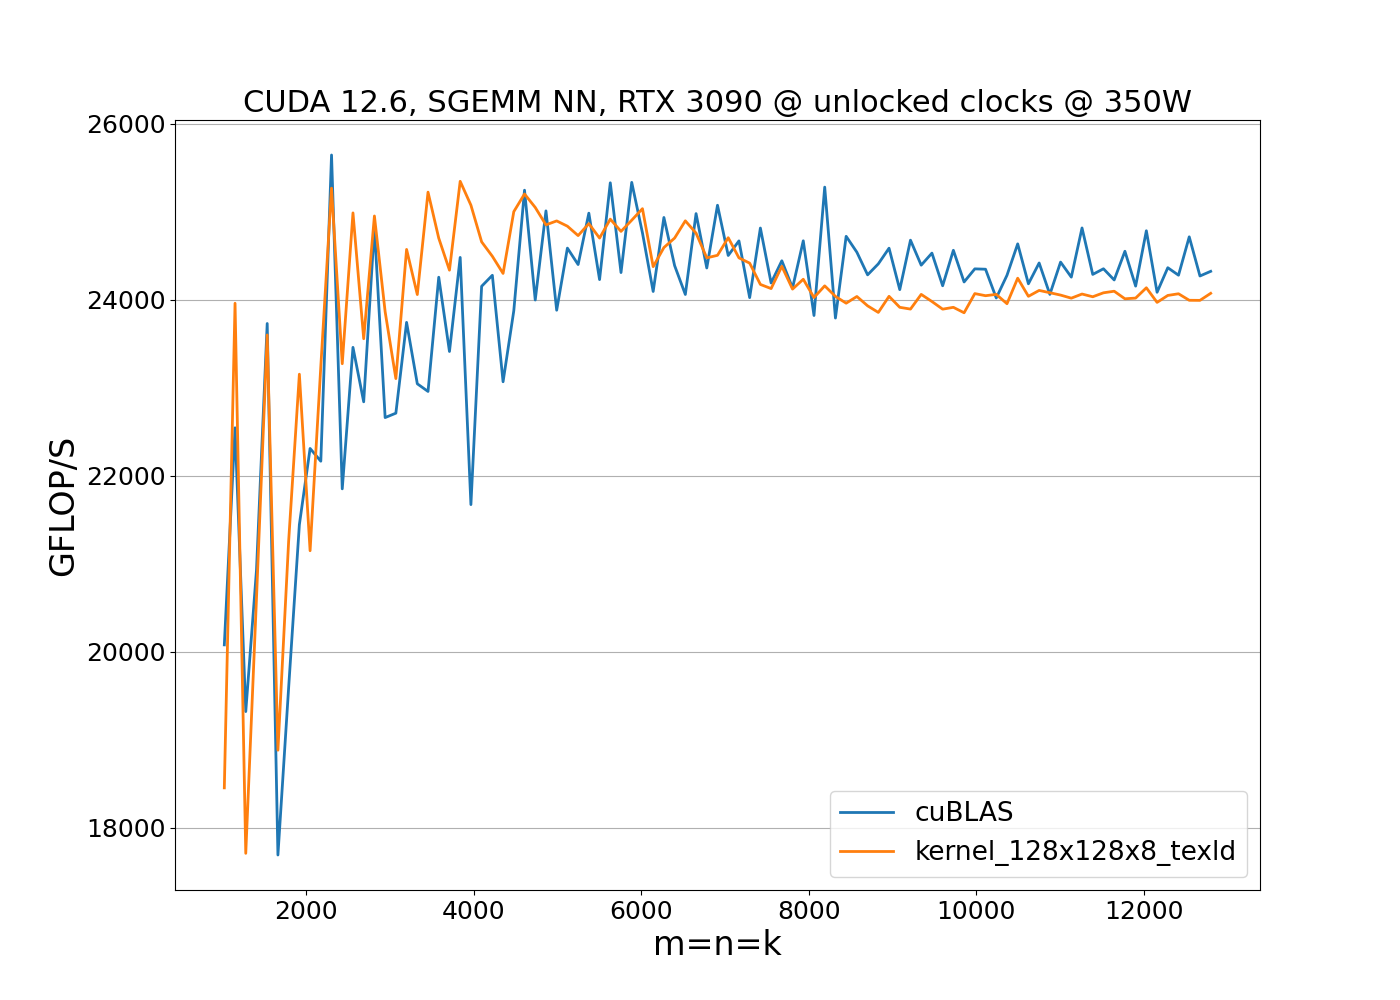
The benchmark results show that the implementation outperforms cuBLAS when clock speeds remain constant. However, performance alone is not enough; we also need to consider power consumption. To evaluate both metrics, we run the benchmark with unlocked clock frequencies:
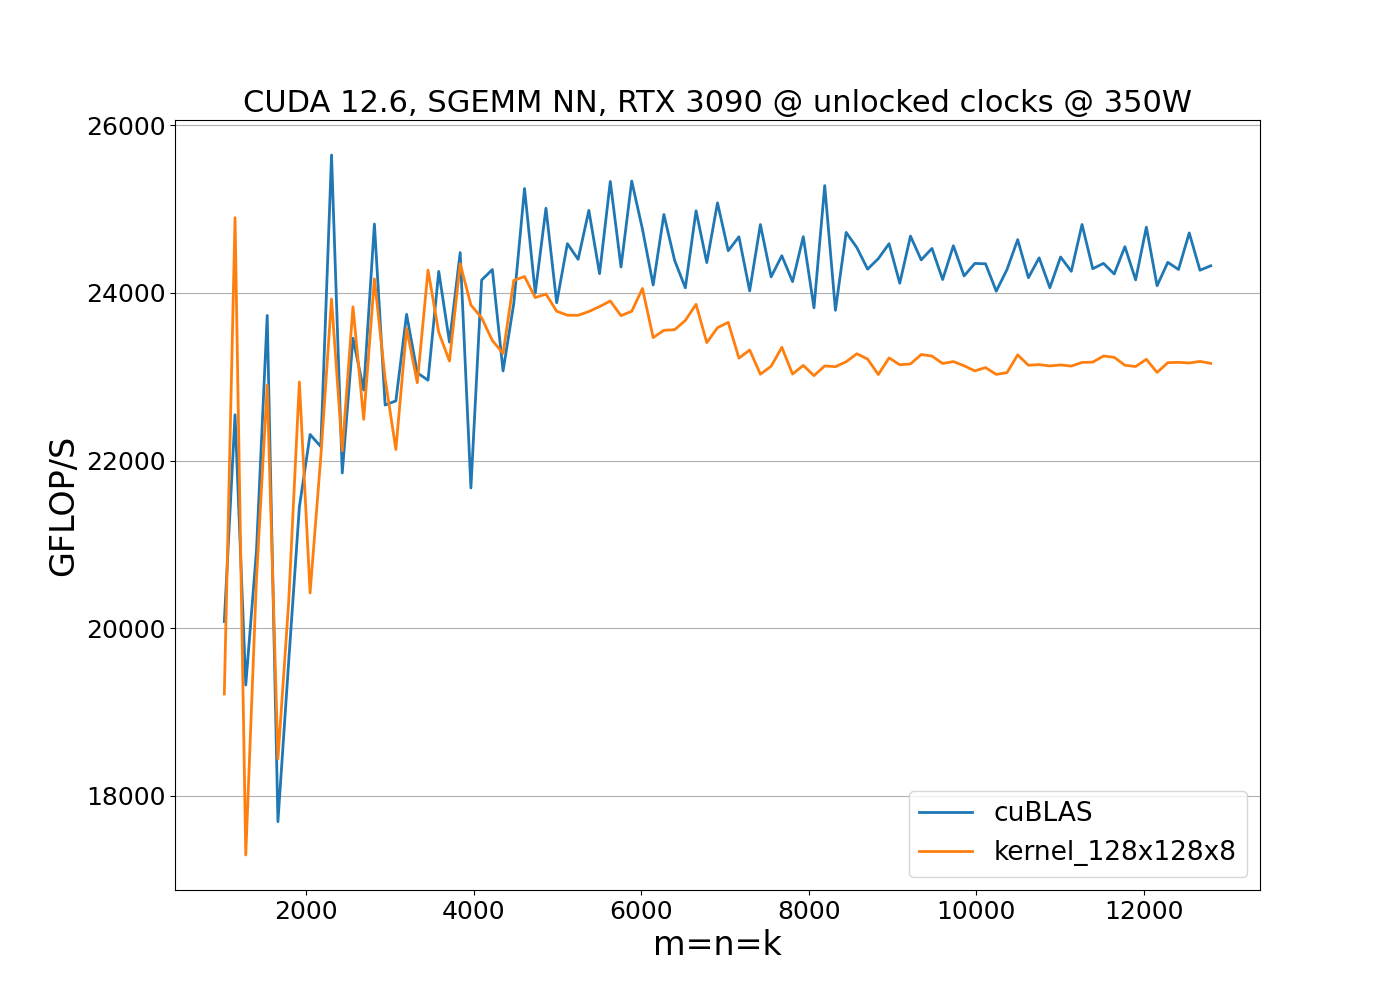
This reveals the effect of throttling due to reaching power limits. While the 128x128x8 kernel is, on average, 3–4% faster than cuBLAS, it consumes 12% more power. The increased power consumption causes the GPU to operate near the power limit for matrix sizes m=n=k>4000, resulting in reduced clock speeds and overall performance degradation. This the reason why optimizing both running time and power consumption is required for achieving a balanced and efficient implementation.
We can slightly improve the running time of the kernel by utilizing vectorized global texture loads. The new kernel is available at 128x128x8_texld. Since the vectorized load instructions impose alignment constraints on the input data, we first verify the memory alignment and ensure the leading dimensions of matrices A and B are divisible by 4:
bool is_aligned = (((unsigned)lda & 3u) == 0) && (((unsigned)ldb & 3u) == 0)
                    && (((unsigned long)A & 15u) == 0) && (((unsigned long)B & 15u) == 0);
If the input data is aligned, we can use the vectorized load instructions. First we need to create texture objects, texture descriptors, and resource descriptors. These are configured to handle float data type with four 32-bit channels (x, y, z, w). The texture objects are then bound to the operands A, B, and passed to the kernel instead of raw pointers A, B.
cudaResourceDesc resDesc;
cudaTextureDesc texDesc;
cudaTextureObject_t tex_a = 0;
cudaTextureObject_t tex_b = 0;
...
if (is_aligned) {
    memset(&texDesc, 0, sizeof(texDesc));
    texDesc.readMode = cudaReadModeElementType;
    texDesc.normalizedCoords = 0;
    memset(&resDesc, 0, sizeof(resDesc));
    resDesc.resType = cudaResourceTypeLinear;
    resDesc.res.linear.desc.f = cudaChannelFormatKindFloat;
    resDesc.res.linear.desc.x = 32;
    resDesc.res.linear.desc.y = 32;
    resDesc.res.linear.desc.z = 32;
    resDesc.res.linear.desc.w = 32;
    resDesc.res.linear.devPtr = A;
    resDesc.res.linear.sizeInBytes = m * lda * sizeof(float);
    cudaCreateTextureObject(&tex_a, &resDesc, &texDesc, NULL);
    resDesc.res.linear.devPtr = B;
    resDesc.res.linear.sizeInBytes = k * ldb * sizeof(float);
    cudaCreateTextureObject(&tex_b, &resDesc, &texDesc, NULL);
    sgemm_texld_128x128x8<<<grid, threads>>>(m,
                                             n,
                                             k,
                                             *alpha,
                                             tex_a,
                                             lda,
                                             tex_b,
                                             ldb,
                                             *beta,
                                             C,
                                             ldc);
    cudaDestroyTextureObject(tex_a);
    cudaDestroyTextureObject(tex_b);
}
Within the kernel, we load data through texture objects using the tex1Dfetch function, which compiles to a single PTX instruction:
float4 texld_a_buffer;
texld_a_buffer = tex1Dfetch<float4>(tex_a, texld_a_offset);
We use global texture loads over normal vectorized global loads (ld.global.v4.f32) because texture loads handle out-of-bounds reads gracefully by returning zeros, avoiding the need for predicated execution. This simplification leads to more efficient code:
Lastly, we developed an 128x256x8 SGEMM kernel leveraging bigger block size $n_S=256$ and asynchronous copy instructions (cp.async.ca.shared.global) which are supported starting with the Ampere architecture. The main advantage of these instructions is that one can overlay computation with memory transfers and avoid pipeline stalls. Additionally, they allow to copy data from global memory directly into shared memory bypassing registers:
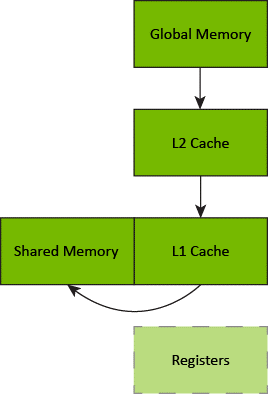
By simply replacing the normal global load instructions with cp.async in the 128x128x8 kernel results in degraded performance - possibly due to higher latencies of the cp.async instructions or suboptimal compiler optimizations. However, combining increased block size with cp.async yields superior results in both speed and power efficiency:
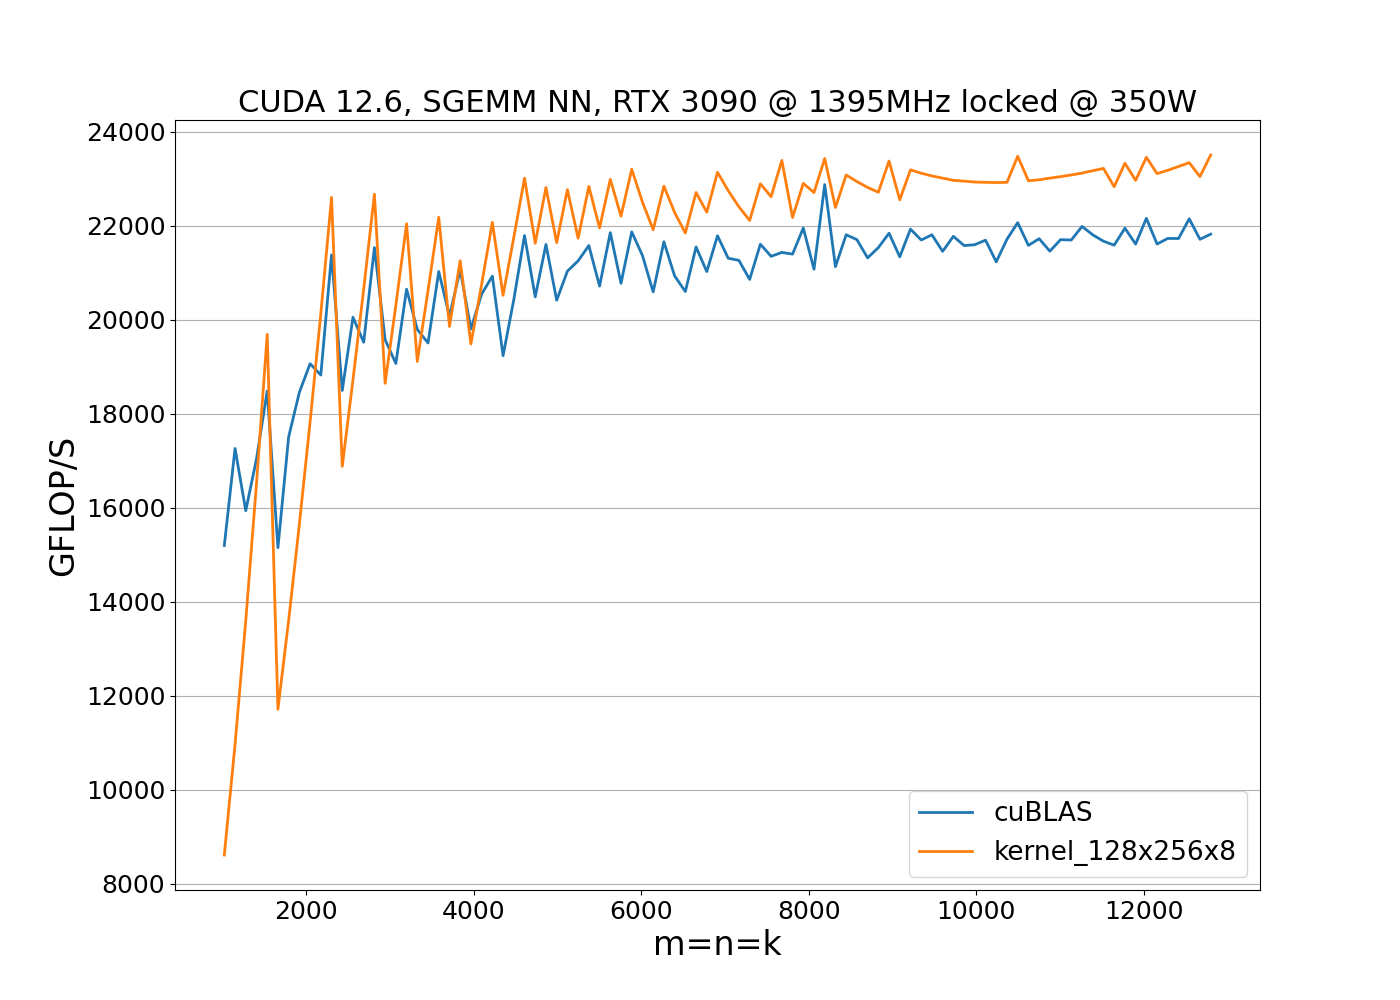
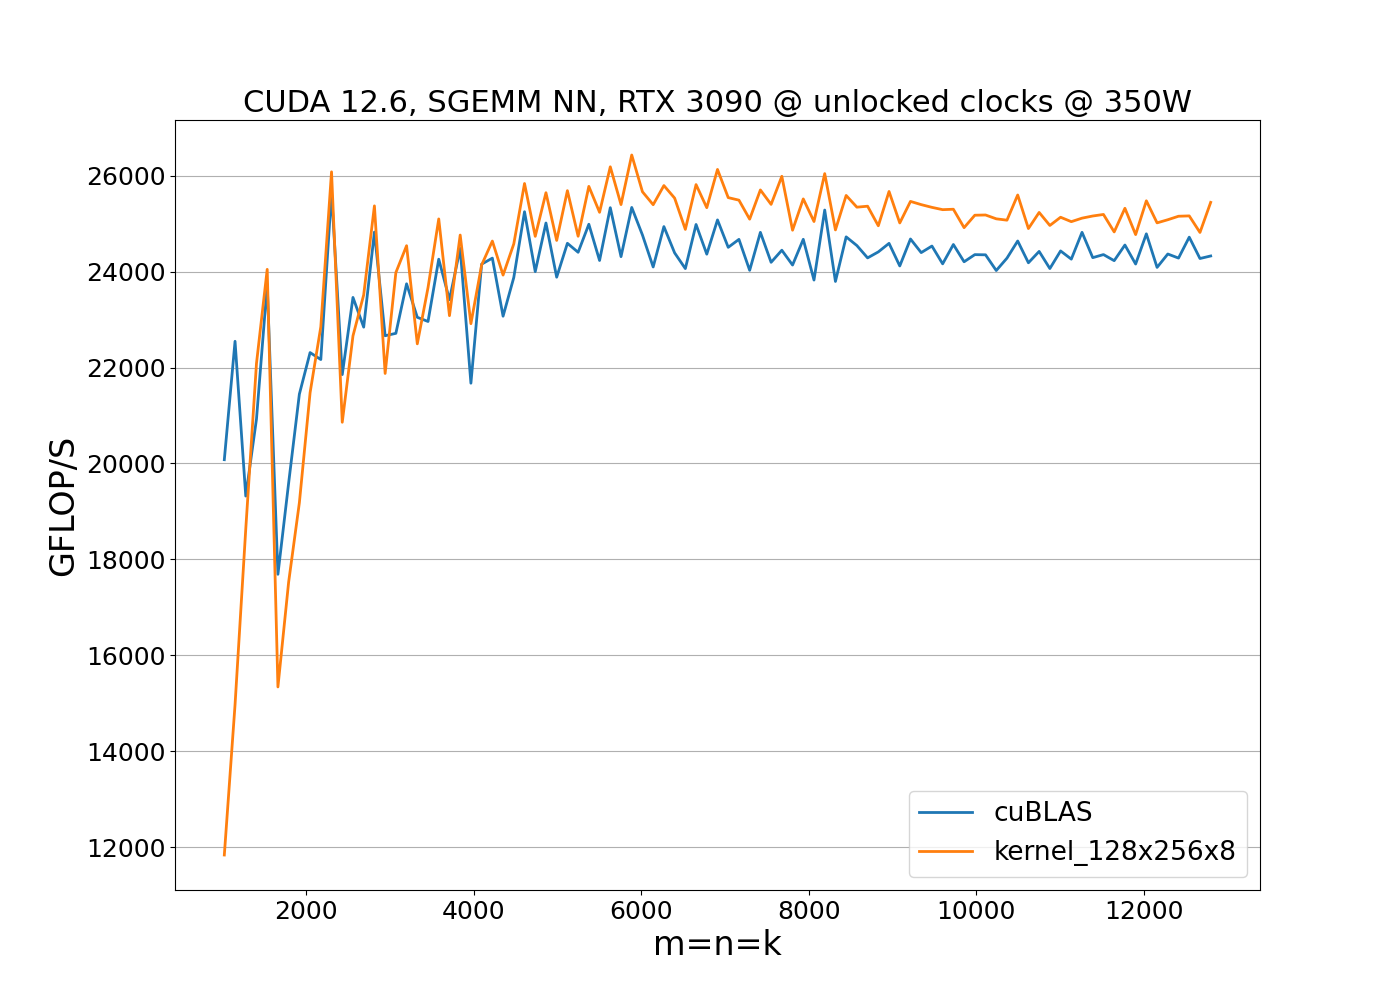
Our final implementation combines the 128x128x8 and 128x256x8 kernels. For smaller matrices m=n < 2500, we use the 128x128x8 kernel, otherwise, the 128x256x8 kernel.